Rustic No-Knead Rosemary Garlic Bread: The Perfect Comfort Food
Intro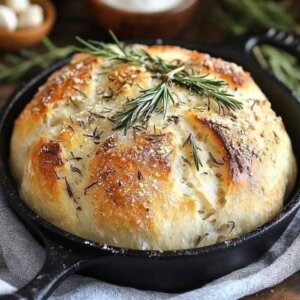 duction
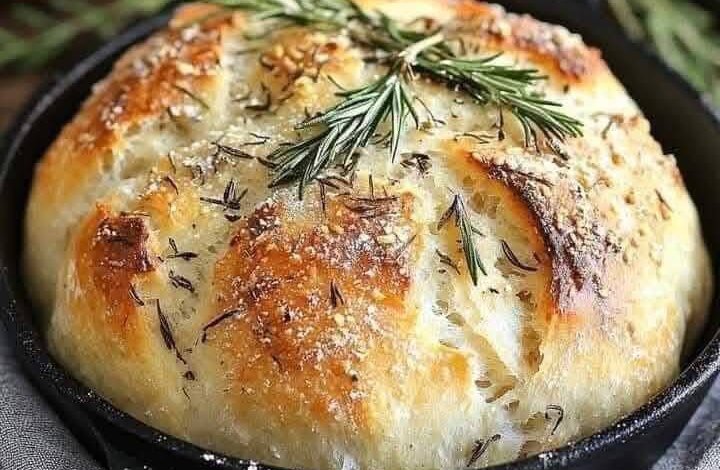
Rustic No-Knead Rosemary Garlic Bread is a beautiful and simple bread that takes the art of breadmaking to a whole new level. This recipe combines the earthy, fragrant flavor of fresh rosemary with the boldness of garlic, creating a bread that’s crispy on the outside, soft on the inside, and incredibly aromatic. The “no-knead” method makes this recipe approachable, even for beginner bakers. By allowing the dough to rise slowly over time, you’re rewarded with a deeply flavored bread that looks and tastes as though it’s come from an artisan bakery.
The beauty of this rustic bread lies in its simplicity. With just a handful of ingredients—flour, water, salt, yeast, garlic, and rosemary—this recipe transforms into a savory masterpiece. The no-knead process involves minimal effort, requiring only a few minutes of prep time. You’ll let time and patience work their magic as the dough develops flavor and texture. This bread is perfect as a side for soups, stews, or pastas, and it also stands proudly on its own with a simple drizzle of olive oil.
In this recipe, we will explore the ingredients, step-by-step instructions, baking methods, and some fascinating history behind the rustic bread tradition. Along the way, we’ll also dive into the health benefits, tips on perfecting the bread, and how you can enjoy this simple yet satisfying loaf.
Ingredients
For the Dough:
- 3 cups all-purpose flour (you can substitute whole wheat flour for a more rustic texture)
- 1 1/4 teaspoons salt (preferably sea salt for better flavor)
- 1 teaspoon instant yeast (or active dry yeast)
- 1 cup water (lukewarm, around 100°F/38°C)
- 2 tablespoons olive oil (for extra richness)
- 1 tablespoon honey (optional, for a touch of sweetness and to help with yeast activation)
- 2 tablespoons fresh rosemary (finely chopped, or 1 tablespoon dried rosemary)
- 4 cloves garlic (minced or crushed, for a bold garlic flavor)
For the Topping:
- 1 tablespoon olive oil (to drizzle over the top before baking)
- 1 tablespoon fresh rosemary (for garnish)
- Sea salt (optional, to sprinkle on top before baking)
Instructions
- Mix the Dough:
- In a large mixing bowl, combine the flour, salt, and instant yeast. Make a small well in the center of the dry ingredients.
- In a separate bowl, mix together the lukewarm water, olive oil, honey (if using), garlic, and rosemary. Stir until the garlic and rosemary are well distributed in the water mixture.
- Pour the wet ingredients into the well of the dry ingredients. Use a wooden spoon or your hands to stir the mixture until it forms a shaggy, sticky dough. Don’t worry about kneading it at this point—just make sure everything is combined.
- Rest and Rise:
- Once your dough is mixed, cover the bowl with a clean kitchen towel or plastic wrap. Let the dough rest at room temperature for about 12-18 hours (overnight works great). This long rise is what gives the bread its characteristic flavor and texture. The dough will become bubbly and slightly puffy.
- Shape the Dough:
- After the dough has risen, turn it out onto a lightly floured surface. Using floured hands, gently shape the dough into a round loaf. Be careful not to deflate it too much as you handle it, as you want to keep the air bubbles in the dough for a light and airy texture.
- Once shaped, place the dough on a piece of parchment paper. You can lightly dust the dough with flour and cover it again with a towel, letting it rise for about 1 hour to allow it to puff up a little more.
- Preheat the Oven:
- While the dough is doing its second rise, place a Dutch oven or heavy-bottomed pot with a lid in the oven and preheat to 450°F (230°C). Preheating the pot is essential for creating the perfect crusty outer layer.
- Bake the Bread:
- Once the dough has risen, carefully remove the hot pot from the oven. Using the parchment paper, gently lift the dough and place it into the hot pot. The parchment paper helps prevent sticking and makes transferring the dough much easier.
- Drizzle the top of the dough with olive oil and sprinkle with a little sea salt and additional fresh rosemary for extra flavor and aroma.
- Cover the pot with the lid and bake for 30 minutes. After 30 minutes, remove the lid and bake for an additional 15-20 minutes, or until the bread has a golden-brown crust and sounds hollow when tapped on the bottom.
- Remove the bread from the pot and let it cool on a wire rack for at least 20 minutes before slicing. The bread continues to cook slightly as it cools.
- Serve and Enjoy:
- Once cooled, slice and serve your rustic rosemary garlic bread with a drizzle of olive oil, or enjoy it as a side to a hearty soup or pasta dish.
Methods
- No-Knead Process: The beauty of this recipe lies in the no-knead process. This method relies on time rather than manual labor to develop the gluten in the dough. The long fermentation time allows the yeast to slowly work through the dough, enhancing the flavor and creating a light, airy crumb.
- Choosing the Right Pot: A Dutch oven or similar heavy pot is essential to replicate the environment of a brick oven. The pot traps steam, creating a humid environment that helps the bread form a crisp, golden crust while maintaining softness inside. If you don’t have a Dutch oven, you can use a heavy baking sheet and place a small pan of water in the oven to create steam.
- Garlic and Rosemary: The minced garlic and rosemary add a fragrant, savory depth to the bread. For a more intense garlic flavor, you can roast the garlic beforehand. Roasted garlic will give the bread a sweeter, more subtle flavor compared to fresh garlic.
- Flour Variations: While the recipe calls for all-purpose flour, you can substitute up to half of the flour with whole wheat flour or bread flour for a different texture and flavor. Whole wheat flour will provide a more rustic, hearty flavor, while bread flour will give the bread more structure and chewiness.
History of No-Knead Bread
The no-knead bread method, although widely popularized by New York Times food columnist Mark Bittman in the early 2000s, has roots in traditional breadmaking techniques that date back centuries. Long before the advent of electric mixers and bread machines, bakers would often allow bread dough to rise for extended periods, taking advantage of natural fermentation.
The rustic style of bread, particularly those using herbs like rosemary, garlic, and other fresh ingredients, can be traced to Mediterranean countries. In Italy, France, and Greece, home bakers have been incorporating fresh herbs into their breads for centuries, adding not only flavor but also medicinal properties to their loaves. Rosemary, in particular, has a rich history tied to remembrance and protection, and it was often included in breads baked for ceremonial purposes.
The no-knead method itself is a modern take on ancient techniques, offering a way to achieve artisan-quality bread without the need for intensive labor or specialized equipment.
Benefits of Rustic No-Knead Rosemary Garlic Bread
- Rich in Flavor: The combination of garlic and rosemary gives this bread a wonderful aromatic profile, turning simple ingredients into something exceptional. The slow fermentation process also imparts a tangy flavor that makes each bite a delight.
- No Kneading Required: One of the major benefits of this recipe is that there’s no need for kneading the dough, which makes it incredibly accessible for beginners. All you need to do is mix the ingredients, let it rise, and bake. The result is a bread that has the same artisanal texture as those requiring hours of labor-intensive kneading.
- Healthier Option: When made with whole wheat flour or other healthy substitutes, this bread becomes a more nutritious option than store-bought breads. Rosemary itself is known for its antioxidant properties, and garlic has been linked to a variety of health benefits, including improved heart health and immune function.
- High in Fiber: If you use whole wheat flour or add in some flaxseed meal or oats, the fiber content of the bread increases, which is beneficial for digestive health.
- Customizable: The recipe is highly adaptable. You can add more herbs, spices, or even cheese, olives, or sundried tomatoes for variation. This means you can make it to suit different tastes or dietary preferences.
Formation and Baking Tips
- Proofing: One of the key steps in the no-knead process is allowing the dough to ferment slowly. This gives it the time it needs to develop a complex, sourdough-like flavor. Don’t rush the process, as patience is crucial.
- Preheating the Pot: The pot you bake the bread in needs to be preheated to the right temperature. This mimics the effect of a wood-fired oven, which allows the bread to puff up and form a beautiful, crackling crust.
- Crust Texture: If you prefer an extra crispy crust, consider spritzing the inside of the hot pot with water before adding the dough. The steam will create a gorgeous,
Introduction
Rustic No-Knead Rosemary Garlic Bread is a beautiful and simple bread that takes the art of breadmaking to a whole new level. This recipe combines the earthy, fragrant flavor of fresh rosemary with the boldness of garlic, creating a bread that’s crispy on the outside, soft on the inside, and incredibly aromatic. The “no-knead” method makes this recipe approachable, even for beginner bakers. By allowing the dough to rise slowly over time, you’re rewarded with a deeply flavored bread that looks and tastes as though it’s come from an artisan bakery.
The beauty of this rustic bread lies in its simplicity. With just a handful of ingredients—flour, water, salt, yeast, garlic, and rosemary—this recipe transforms into a savory masterpiece. The no-knead process involves minimal effort, requiring only a few minutes of prep time. You’ll let time and patience work their magic as the dough develops flavor and texture. This bread is perfect as a side for soups, stews, or pastas, and it also stands proudly on its own with a simple drizzle of olive oil.
In this recipe, we will explore the ingredients, step-by-step instructions, baking methods, and some fascinating history behind the rustic bread tradition. Along the way, we’ll also dive into the health benefits, tips on perfecting the bread, and how you can enjoy this simple yet satisfying loaf.
Ingredients
For the Dough:
- 3 cups all-purpose flour (you can substitute whole wheat flour for a more rustic texture)
- 1 1/4 teaspoons salt (preferably sea salt for better flavor)
- 1 teaspoon instant yeast (or active dry yeast)
- 1 cup water (lukewarm, around 100°F/38°C)
- 2 tablespoons olive oil (for extra richness)
- 1 tablespoon honey (optional, for a touch of sweetness and to help with yeast activation)
- 2 tablespoons fresh rosemary (finely chopped, or 1 tablespoon dried rosemary)
- 4 cloves garlic (minced or crushed, for a bold garlic flavor)
For the Topping:
- 1 tablespoon olive oil (to drizzle over the top before baking)
- 1 tablespoon fresh rosemary (for garnish)
- Sea salt (optional, to sprinkle on top before baking)
Instructions
- Mix the Dough:
- In a large mixing bowl, combine the flour, salt, and instant yeast. Make a small well in the center of the dry ingredients.
- In a separate bowl, mix together the lukewarm water, olive oil, honey (if using), garlic, and rosemary. Stir until the garlic and rosemary are well distributed in the water mixture.
- Pour the wet ingredients into the well of the dry ingredients. Use a wooden spoon or your hands to stir the mixture until it forms a shaggy, sticky dough. Don’t worry about kneading it at this point—just make sure everything is combined.
- Rest and Rise:
- Once your dough is mixed, cover the bowl with a clean kitchen towel or plastic wrap. Let the dough rest at room temperature for about 12-18 hours (overnight works great). This long rise is what gives the bread its characteristic flavor and texture. The dough will become bubbly and slightly puffy.
- Shape the Dough:
- After the dough has risen, turn it out onto a lightly floured surface. Using floured hands, gently shape the dough into a round loaf. Be careful not to deflate it too much as you handle it, as you want to keep the air bubbles in the dough for a light and airy texture.
- Once shaped, place the dough on a piece of parchment paper. You can lightly dust the dough with flour and cover it again with a towel, letting it rise for about 1 hour to allow it to puff up a little more.
- Preheat the Oven:
- While the dough is doing its second rise, place a Dutch oven or heavy-bottomed pot with a lid in the oven and preheat to 450°F (230°C). Preheating the pot is essential for creating the perfect crusty outer layer.
- Bake the Bread:
- Once the dough has risen, carefully remove the hot pot from the oven. Using the parchment paper, gently lift the dough and place it into the hot pot. The parchment paper helps prevent sticking and makes transferring the dough much easier.
- Drizzle the top of the dough with olive oil and sprinkle with a little sea salt and additional fresh rosemary for extra flavor and aroma.
- Cover the pot with the lid and bake for 30 minutes. After 30 minutes, remove the lid and bake for an additional 15-20 minutes, or until the bread has a golden-brown crust and sounds hollow when tapped on the bottom.
- Remove the bread from the pot and let it cool on a wire rack for at least 20 minutes before slicing. The bread continues to cook slightly as it cools.
- Serve and Enjoy:
- Once cooled, slice and serve your rustic rosemary garlic bread with a drizzle of olive oil, or enjoy it as a side to a hearty soup or pasta dish.
Methods
- No-Knead Process: The beauty of this recipe lies in the no-knead process. This method relies on time rather than manual labor to develop the gluten in the dough. The long fermentation time allows the yeast to slowly work through the dough, enhancing the flavor and creating a light, airy crumb.
- Choosing the Right Pot: A Dutch oven or similar heavy pot is essential to replicate the environment of a brick oven. The pot traps steam, creating a humid environment that helps the bread form a crisp, golden crust while maintaining softness inside. If you don’t have a Dutch oven, you can use a heavy baking sheet and place a small pan of water in the oven to create steam.
- Garlic and Rosemary: The minced garlic and rosemary add a fragrant, savory depth to the bread. For a more intense garlic flavor, you can roast the garlic beforehand. Roasted garlic will give the bread a sweeter, more subtle flavor compared to fresh garlic.
- Flour Variations: While the recipe calls for all-purpose flour, you can substitute up to half of the flour with whole wheat flour or bread flour for a different texture and flavor. Whole wheat flour will provide a more rustic, hearty flavor, while bread flour will give the bread more structure and chewiness.
History of No-Knead Bread
The no-knead bread method, although widely popularized by New York Times food columnist Mark Bittman in the early 2000s, has roots in traditional breadmaking techniques that date back centuries. Long before the advent of electric mixers and bread machines, bakers would often allow bread dough to rise for extended periods, taking advantage of natural fermentation.
The rustic style of bread, particularly those using herbs like rosemary, garlic, and other fresh ingredients, can be traced to Mediterranean countries. In Italy, France, and Greece, home bakers have been incorporating fresh herbs into their breads for centuries, adding not only flavor but also medicinal properties to their loaves. Rosemary, in particular, has a rich history tied to remembrance and protection, and it was often included in breads baked for ceremonial purposes.
The no-knead method itself is a modern take on ancient techniques, offering a way to achieve artisan-quality bread without the need for intensive labor or specialized equipment.
Benefits of Rustic No-Knead Rosemary Garlic Bread
- Rich in Flavor: The combination of garlic and rosemary gives this bread a wonderful aromatic profile, turning simple ingredients into something exceptional. The slow fermentation process also imparts a tangy flavor that makes each bite a delight.
- No Kneading Required: One of the major benefits of this recipe is that there’s no need for kneading the dough, which makes it incredibly accessible for beginners. All you need to do is mix the ingredients, let it rise, and bake. The result is a bread that has the same artisanal texture as those requiring hours of labor-intensive kneading.
- Healthier Option: When made with whole wheat flour or other healthy substitutes, this bread becomes a more nutritious option than store-bought breads. Rosemary itself is known for its antioxidant properties, and garlic has been linked to a variety of health benefits, including improved heart health and immune function.
- High in Fiber: If you use whole wheat flour or add in some flaxseed meal or oats, the fiber content of the bread increases, which is beneficial for digestive health.
- Customizable: The recipe is highly adaptable. You can add more herbs, spices, or even cheese, olives, or sundried tomatoes for variation. This means you can make it to suit different tastes or dietary preferences.
Formation and Baking Tips
- Proofing: One of the key steps in the no-knead process is allowing the dough to ferment slowly. This gives it the time it needs to develop a complex, sourdough-like flavor. Don’t rush the process, as patience is crucial.
- Preheating the Pot: The pot you bake the bread in needs to be preheated to the right temperature. This mimics the effect of a wood-fired oven, which allows the bread to puff up and form a beautiful, crackling crust.
- Crust Texture: If you prefer an extra crispy crust, consider spritzing the inside of the hot pot with water before adding the dough. The steam will create a gorgeous,